Phoebe & Phoebe

Phoebe & Phoebe - Elephant Softies

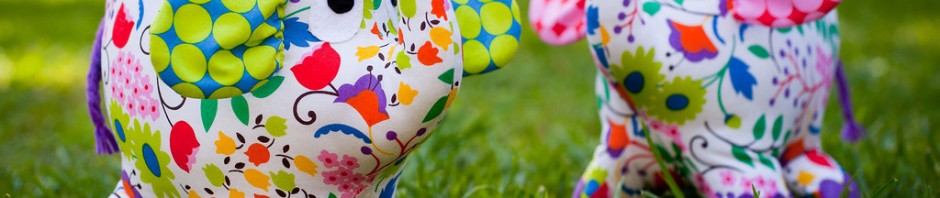
It’s about time I introduce Phoebe & Phoebe. These gorgeous elephant softies were made using the “Phoebe” pattern from Melly & Me.

I’d seen a few good reviews and great results from these patterns, the softies look really impressive! I was feeling quite intimidated initially but wanted to give one a go so chose the elephant as I thought the few large pieces would hopefully be a bit easier to manage than a lot of small fiddly bits.

Phoebe & Phoebe - Elephant Softies

These two were made for my nieces for Christmas (yes it’s taken me some time to post about them). The fabrics are from the Hoopla for Moda range that I picked up, along with the pattern, from Kelani Fabric. Niece #2 was born in the days leading up to Christmas, we didn’t know she was going to be a girl so I had the ears sewn on to both elephants, and was waiting for the news before sewing the blankets on. Had she been a boy they would have gone the other way around but the plan for two girls was to mix them up. They also have their initials embroidered into the inner side of a leg to save any fights in future about whose was whose.

The pattern requires a mix of machine and hand sewing, and I chose to blanket stitch around the applique felt toes and eyes by hand using 2 strands of embroidery cotton. There were a couple parts that I found a bit tricky or would do a bit differently next time…

  • I found there were some seams that could have been a little wider or used a bit of reinforcement, particularly the curves between the front and back legs on each side and the front and back where four seams met.
  • I may have done something not quite right but the plaited felt tails aren’t particularly strong, which I found out when my two year old niece used it for carrying around her elephant (as you do when you’re two) and it didn’t last long – hers now has an adorable stubby tail.

Phoebe & Phoebe - Elephant Softies

Overall I absolutely adore these softies, and have had many kind comments about them. I’ll definitely use this pattern again in future (in fact I have just made another one which I’ll be sharing) and would love to try some of the other patterens by Melly & Me, perhaps Bubbles the Unicorn, Dawn the Deer Foal or Mrs. Perkins the Giraffe, to name a few.

Zippers for Bags Class with Nicole Mallalieu

Nicole Mallalieu & I

Earlier this week I was lucky enough to take part in a day class with the Queen of Bag Making (amongst many other things), Nicole Mallelieu from You Sew Girl!

First up, a huge thank you must go out to the team at Peg’s Pieces in Kirrawee for organising Nicole’s visit, especially our host Bernadette who was also our fabulous “gofer”, tea lady and colour matching assistant all day for us.

Zips really don’t have to be that scary, it can seem that way if you’ve never been shown how to sew one in but as Nicole said, “it’s only fabric and haberdashery”. I was shown during a lesson after buying my sewing machine, and there are plenty of great tutorials out there for little zipper pouches that are great practice. Having had that bit of practice behind me I wanted to see how to go about using them in a bag, I love bags with lots of pockets for organising things.

The Zippers for Bags class was perfect as it focused on the different options for using zippers to customise and add pockets to a bag. We got all the way through making two of the options for our bags, with great notes for a few other options as well. The rest of the bag is still to come but when it’s done there will be pockets for everything! Almost.

TopstitchingZipper bag gusset

It was an incredible day, and absolutely exhausting jamming all those great tips and ideas into my head before driving home in the wind and rain but I loved every minute and would jump at the chance to take more classes with Nicole. Sounds like great excuse for a trip to Melbourne.

In preparation for the class there were a few things I needed to get my hands on. Things I’d never used before but are surely going to become two of my favourite new toys:

Vliesofix T 6 – this is a roll of thin (6mm) fusbile tape with paper on one side so you can iron to one piece of fabric, rough side down, then rip off the paper and iron to the other side. It’s really handy instead of trying to use pins for holding together little fiddly edges and small pieces before stitching, I’d run out of fingers trying to count how many times “Vliesofix it!” was called out during the day. I found mine in Spotlight (last box!) but it was also available at Peg’s Pieces, and hopefully somewhere near you.

Vilene S320 – This is an amazing fusible non-woven interfacing, when ironed on to the back of fabric it adds support and helps improve accuracy for beautiful crisp edges and corners. It was a little tricky to find and nearly all references to it online were from the You Sew Girl site and blog. So where can you buy S320? I got mine before the class from Voodoo Rabbit who stock a great range of You Sew Girl products in their online store. Peg’s Pieces also had it available along with other You Sew Girl items and recommendations, both stores are super friendly and helpful if you’re after anything to help you make beautiful bags.

If you’ve ever wanted to try making your own bag or purse keep an eye out and if Nicole Mallalieu is ever doing a class near you, jump on it! If you can’t make it to a class, try one of her patterns or kits, they come with really detailed instructions that are almost as good as having her there to help you out.

Interfacing
Zipper Gusset