Category Archives: classes

Getting back in the groove with a Social Tote

Earlier this year in June I was lucky to get a spot in a class to make the Social Tote, lead by Lorena Uriate and hosted at Material Obsession. I already owned the pattern by Carolyn Friedlander & Anna Graham (Noodlehead) but having read over it I wasn’t up to tackling it by myself. There are lots of additional photos on Carolyn Friedlander’s site to help explain the process if you’re not so lucky to have someone to show you through it.

Social Tote - a portable sewing caddy

The class was scheduled for a couple weeks after the Modern Quilt Show Australia held in May. I knew I’d be burnt out after the show and could use a kickstart to get back in to sewing & quilting so it was perfect timing.

Social Tote - a portable sewing caddy
Empty Social Tote

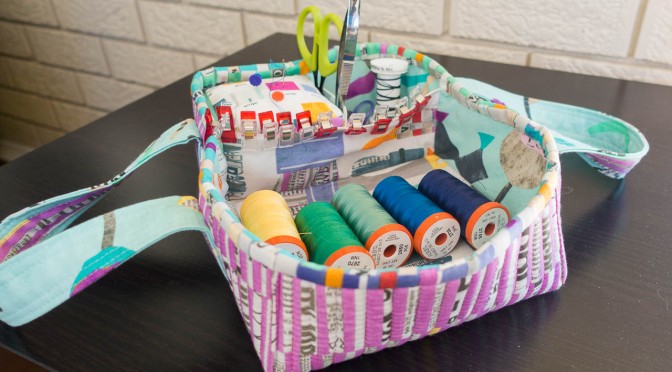
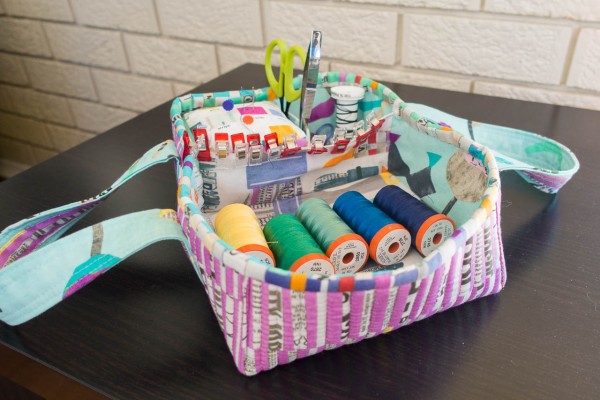
The inside configuration of the social tote, with and without all the fun stuff.

The social tote isn’t huge but is just the right size for carrying around your needles, threads, scissors and other small bits and pieces for a smaller project like EPP, or even just the little parts of a larger project. It sits on the arm of my lounge and acts as a thread catcher while I work and lets me easily move around. There are 2 smaller compartments and one larger compartment, perfect for a small kitten to climb into and then play with the built-in toys (clover clips & handles).

Social Tote - The perfect kitty basket with built in toys
Kitten Approved!

The pattern includes instructions for a pin cushion that fits perfectly into one of the smaller compartments. I like that it also helps hold the shape of the tote. One of the tips Lorena shared was that small scraps of batting are great for filling the pincushion and helping it hold its shape, I used a combination of batting scraps and polyfill for mine.

Social Tote Pincusion

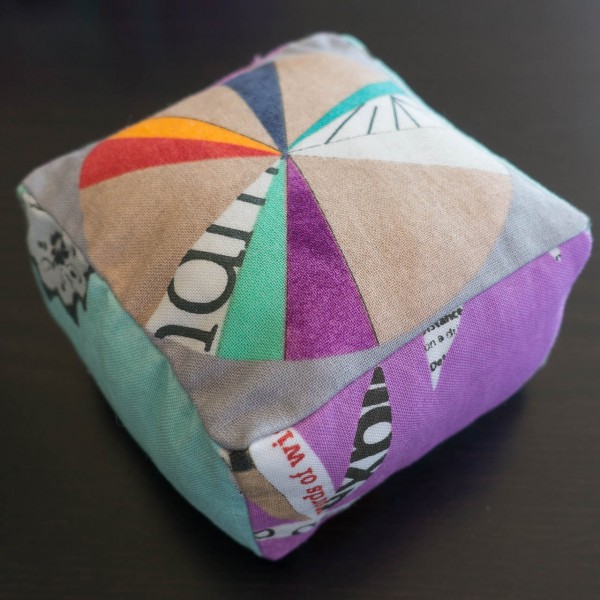
Both sides of the pin cushion – my favourite print (the paint chips) and a perfectly sized wedge circle!

There are two little side pockets between the handles which are great for adding small feature fabrics. For my Social Tote I used various fabrics from the Paint line by Carrie Bloomston. The outside is one of my most favourite prints, I love the “Not Pink” colour combined with newsprint. The inner bottom uses the paint brushes print and I picked a few complementary colours & prints for other parts. I saved the paint chips for my pockets and one side of the pin cushion and the multi-colour woven print was a perfect binding to tie it all together.

Social Tote using Paint Fabrics by Carrie Bloomston of SUCH Designs

If I were to make another I would probably try to make it a little deeper and I do wonder if it would be possible to add some kind of closure or lid for it so that I could put it in with other supplies in a bag for sewing events outside home. I’m really happy I went through the process of making this tote and am especially grateful for Lorena’s expert guidance, it was a great day out and I’ll be keeping an eye out for more workshops up at Material Obsession in future.

Graffiti Quilting Workshop with Karlee Porter

This past weekend I was lucky to have a place in a 2 day workshop, hosted by the Wollongong Modern Quilt Guild, we welcomed artist and quilter Karlee Porter to Wollongong for the final leg of her Australian  tour. Karlee’s signature style is called Graffiti Quilting, an approach to free-motion quilting that builds up a design from layers of elements, some which have been inspired by street art, some using common quilting motifs in a modern way.

On the first morning Karlee took us through 20 or so designs and techniques which we practiced in our sketch books, and then started to combine.

Graffiti Quilting Sketches

Left: Sketching designs, my leaves are terrible but I’ll keep working on them. Right: We all started with the same centre elements (black) then had 5 minutes to add our own ideas to kick off a design.

After lunch we put those ideas onto fabric with no real plan and only gentle direction provided by Karlee. My free motion skills were a little rusty but I slowly found a rhythm. I’d do a little bit and then stop and think about the next element, trying to pick something to suit the space or contrast a geometric design with a soft and swirly one, the whole while referring back to my sketch book and the fun analogies about the different designs.

Graffiti Quilting Day 1 Sampler
Graffiti Quilting Day 1 Sample – Aurifil 28wt blue varigated thread on black solid fabric from Spotlight.
Graffiti Quilting Class
Everyone concentrating hard on their quilt samples

That evening we were joined by more WMQG members for a trunk show where Karlee spoke about her background and a selection of her quilts, explaining the progression of her work, the highs and lows of entering shows and different experiments along the way. I particularly enjoyed hearing about her collaborations with other artists, having their designs digitally printed on fabric which is then quilted. Of course, cheese and wine with guild members and our guests made for a really enjoyable evening.

On day two we spoke more about materials, threads, fabrics and battings that suit this style of quilting and what situations they suit best. Karlee also took us through different layout options and then suggestions on how certain elements go together. I chose to try quilting in rows with a common circular element up the middle.

Karlee Port & I with my sample quilt
Here’s my sample at the end of the day, couldn’t have done it without Karlee’s encouragement

For my sample piece I’ve used black solid from Spotlight with 2 layers of cotton batting. The thread is Aurifil 28wt in a magenta colour and then a soft medium pink, the next two colours will be a light grey and then finally white. I found I really liked the geometric elements, particularly the columns and my curves were definitely improving with practice.

Graffiti Quilting Detail - Centre
The bottom centre circle turned out better than I could have thought possible, with just a few circle guides and I sketched the leaves first because I find them so tricky to get the curve right.
Graffiti Quilting Detail - Geometric Columns
Love those columns, they can be a city skyline, a stereo equalizer or local rock formations.

All in all I had a great time and really learned a lot from Karlee, she’s fun and genuine with lots of tips and tricks for creating our own unique spin on Graffiti Quilting. I hope to practice more and put together some smaller pieces that can be used for pouch & bag panels, and will most definitely keep sketching and drawing, I found I really enjoyed that part! Here’s a start on something in my sketch book…

Graffiti Quilting - New Sketches
A fresh page & textas, I no longer feel paralysed trying to envision the entire design, just add a bit at a time and the whole becomes much greater than the some of it’s parts.

Riley Blake MQG Challenge – Quilt-As-You-Go Bag

It was a perfect match, a Modern Quilt Guild Basics Challenge sponsored by Riley Blake Designs to make anything quilted, with six fat-eighths to start us off, and a fabulous Craftsy class to make Quilt-As-You-Go Patchwork Bags that I could not wait to try. I’m so excited to share this bag so look out, lots of pretty pictures coming up!

Riley Blake Challenge - Quilt As You Go Bag

I’d been hoping for a chance to take the Quilt-As-You-Go Patchwork Bags Craftsy class with with Tara Rebman when it was announced that Riley Blake Designs would be sponsoring the 3rd annual MQG members fabric challenge, we heard about it at a Wollongong MQG sew day and I knew exactly what I was going to make. Light bulb moment!

Riley Blake Challenge - Quilt As You Go Bag

We received our fabrics towards the end of last year as 5.5″ x WOF strips from the range of Riley Blake basics. The fabrics I received were:

  • solid dark grey
  • light grey and white 1″ stripes
  • navy and white medium gingham
  • aqua tone on tone medium chevron
  • white on yellow small dots
  • orange pop

Riley Blake Challenge - Quilt As You Go Bag

I’ve supplemented these with some other Riley Blake fabrics from my stash and a few solids including:

  • yellow tone on tone small dot
  • orange tone on tone small dot
  • white on aqua dot
  • orange solid
  • yellow solid
  • sea green solid
  • navy solid for the bias binding
  • navy blue solid cotton duck cloth for the bag base

Riley Blake Challenge - Quilt As You Go Bag

I started off by cutting a few small and medium strips and squares of varying sizes from each fabric and began the quilt as you go process which uses a log cabin approach. Each round adds a new piece of fabric to cover the join of the previous two pieces and gets quilted down (as you go), towards the edges using pre-patched slabs rather than single fabric pieces. Stay tuned for an upcoming post reviewing the class and sharing some more details of the bag making.

Riley Blake Challenge - Quilt As You Go Bag

I used Aurifil 50wt threads for this project, a light grey/silver (2600) for piecing & quilting the main panels and navy (2745) for quilting on the base panel and attaching the bias binding. My quilting is roughly 1/4″ apart, though I did vary on purpose to give some subtle difference in textures and in some cases to suit the fabric.  My favourite part of the quilting is this navy gingham piece below.

Riley Blake Challenge - Quilt As You Go Bag

The bag is a pretty good size as you can see above with it on my shoulder. In opens up wide and has a handy flap with magnetic snap to keep it closed. I included both pocket options, a hidden zipper pocket on one side and a divided pocket on the other.

Riley Blake Challenge - Quilt As You Go Bag

I really love these challenges, this one in particular took me out of my comfort zone with colour but seeing all the fabrics combined I quite like the overall effect of the outside of the bag.  I wish I didn’t choose an orange solid for the lining, next to the navy binding all I see is football team colours. This is a perfect case where a subtle tone on tone chevron or dots would have been a better choice for such a large area. I already have some fat quarter packs of the Riley Blake small dots and tone on tone dots and I’m sure more of their basics will make their way into my stash, I just haven’t been able to source it locally yet so couldn’t get it in time to finish my bag.

Riley Blake Challenge - Quilt As You Go Bag

A huge thanks to Riley Blake Designs for sponsoring this challenge and providing the fabric for us to play with. Thank you also to the Modern Quilt Guild for organising these challenges for us and to our awesome leader Rachael of the Wollongong Modern Quilt Guild who does all the organising so we can participate.

Craftsy Class Sketches

I’ve recently discovered Craftsy, an online community for people who like to make things. It’s main concept is to provide online video classes that cover quilting, knitting, crochet, cake decorating, jewellery, paper crafts and more.

After taking a look at a couple of the free class videos, and being really impressed with the concept and format, I took the plunge and opted to try a paid class – Machine Quilting Negative Space with Angela Walters. Below are some of my quilty sketches from Lesson 2 of the class.

Craftsy Quilting Class - Lesson 2 Sketches

While you can learn a lot from YouTube, these videos are professionally filmed, follow structured class formats and provide supporting class materials. You need an Internet connection to watch the videos through your browser, or the iPhone or iPad apps, but you can watch the videos as often as you like, pause, rewind, watch something over and over until you’re ready to move on, and even save notes any any point along in the video.

The community site lets you create a profile, post progress updates, and best of all, ask question and interact with your other ‘classmates’ and your expert teacher! In addition to classes you can participate in workshops (craft-alongs) and upload projects (which may or may not be related to the classes). If that wasn’t enough, there’s an online store for fabric, yarn and other class-related supplies, and you can also purchase patterns by other Craftsy users.

There are free classes to try on basic sewing, bag making, a patchwork block-of-the-month and other starter techniques & small projects. I’d definitely recommend giving one a go just to see what it’s all about. It doesn’t matter if you don’t complete the whole class, they’re a good taster for the format and flow of classes if something else interests you.

There are a variety of paid classes that range between approximately $15 – $50. I have worked out that by purchasing classes via the iPhone or iPad app they’re processed as in-app purchases which means you can use iTunes credit (from vouchers or linked up to a card).

So what are you waiting for, go try a Craftsy class to learn & make something new!

Craft Show Catch Up

The Sydney Craft and Quilt Fair 2012 has come and gone, it was my third time visiting the show and each year I learn more ways to make the most out of a day there. There’s so much to see and do (and buy) it can be a bit overwhelming but you can only do so much, you just have to work out what you’ll get the most out of. This year I also went to the Craft and Sewing Show at Rosehill Gardens Racecourse, it’s a smaller show so I felt like I got all the way around quite comfortably. If you don’t love huge crowds and getting lost it might be a better alternative if you want to see what a craft show is all about.

For me, the most rewarding part of a show are the hands on workshops. Most go for 1 hour, cost around $15-$25 for a small kit or materials and you get to learn something new with an expert there to help and guide you. There’s plenty of inspiration on offer throughout the various talks, demonstrations and at the stalls, but I always find I’m much more likely to really give something a go when I’ve got someone there to help me through those first steps and I don’t have to think about getting all my bits and pieces organised. I’ve even finished off a few of the small projects that I’ve started at the shows!

Sashiko Sampler Scissor Pouch

Sashiko Sampler Scissor Pouch - FrontSashiko Sampler Scissor Pouch - Back

The kit for this project came from a 1 hour sashiko workshop run by Indigo Niche at the Sydney Craft and Sewing Show back in March. Sashiko is basically a running stitch technique used for hand quilting and embroidery. It comes from Japan and traditionally uses white thread on Indigo fabric.

I enjoyed this workshop so much I also bought a couple of other samplers with the pattern already marked on the fabric, and a beautiful variegated thread to use. I’ll be sure to share some photos once the first piece has progressed a little further.

Felt Applique Needle Book

Felt Applique Needle Book - Marg Low DesignsFelt Applique Needle Book - Marg Low Designs - Inside

This little needle book was from a felt applique workshop with Marg Low of Marg Low Designs. She was absolutely lovely and gave us lots of great tips, by the end of the workshop I had the 3 flower pieces stitched on to the front, and I added the decorative stitches on the inside page on the train home. The next day I stitched on the inside fabric piece which also functioned as the binding, attached the inside felt page and voila!

There were a number of times while making this little needle book that I would pause while getting the next piece of thread ready and think, “Now where should I put my needle so I don’t lose it?” Duh… in the needle book perhaps? Handy little things they are, and super cute with a little felt applique.

English Paper Piecing

English Paper Pieced Hexagons

I’ve heard a lot about paper piecing so thought I’d find out how it works. This workshop by Blue Willow Cottage was a great introduction to hexagons, and the kit provided the fabric scraps and 7 pre-cut papers (enough to make a flower) as well as a template for cutting the fabric hexagons and the cutest little cutting mat (3″ square) and mini rotary cutter. As with all the workshops it was a great little taster to learn the basics and get me interested in trying some more.

I’m not sure what I’ll do with these when I’ve got all 6 petals on my flower finished but it will probably be appliqued onto a background fabric to then use.

So that’s my craft show catchup, there are actually more little demo projects from the Quilt and Craft Fair, but I’ll spare you for the time being and save those for another time. If you get the chance to go to a craft or sewing show be sure to check out the website or brochures before you go to see what demonstrations and workshops are on offer and GET IN EARLY to book as I’ve found the workshops fill up really quickly. You’ll have to race me though!