Category Archives: finishes

Ada’s Quilt: Step Down Piecing with Wombat Wonderland

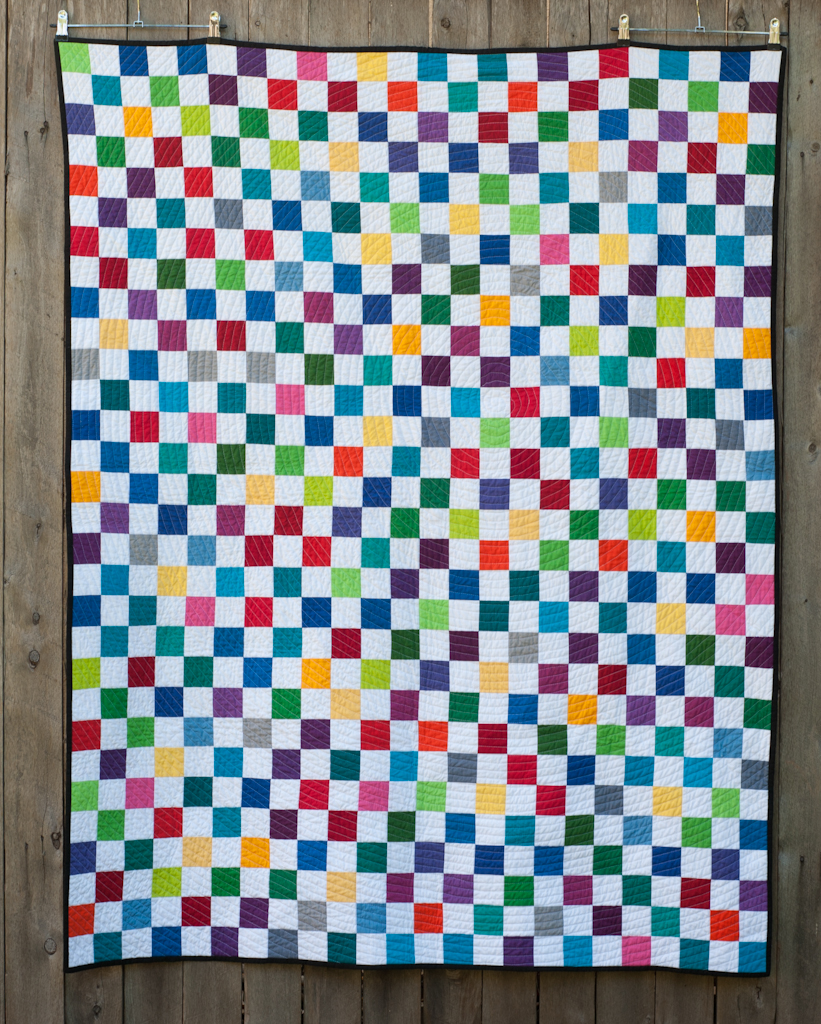
This sweet little quilt combines a whole lot of Aussie inspiration. The fabulous fabrics are from Saffron Craig’s Wombat Wonderland collection which are 100% organic GOTS approved cotton. The pattern is a technique from Sarah Fielke’s Craftsy class, Big Techniques from Small Scraps. How adorable are those wombats?!

Ada's Quilt - Step Down Piecing using Wombat Wonderland by Saffron Craig

The larger squares were fussy cut from Wombats in my Garden and complemented by Sunrays, Flower Spot and (my favourite) Triangles. The smaller dark squares are from Wombat Lovehearts, there was the occasional bit of wombat surgery, creating some of my favourite details with wombats wandering in and out of their little windows.

Wombat Wonderland

I used strips of the same range for the back, including Sunflower Garden which was too pretty to cut up for the front.

Ada's Quilt Back

I finished up the top a couple of weeks ago, you can read more about the technique and the rest of Sarah’s class in my previous post. The top came with me on a long weekend away where it was basted and I began the hand quilting, approximately 1/4″ inside each of the squares.

Hand Quilting & Embroidery

The quilting was done in bursts over a few weeks, once I started each session I didn’t want to put it down. I really enjoyed this process and found Sarah’s technique easy to pickup and really enjoyable, when you get into a groove it is quite meditative. The result of using organic cottons and hand quilting is a beautifully soft baby quilt.

I love the striped binding, reminds me of liquorice all sorts (yum!)

Stripey Binding

This quilt was gifted to a work friend whose baby girl arrived in January. In place of a label I hand embroidered her name and the year. I hope it’s used and loved for some time to come.

Ada's Quilt

A Baby Quilt in Record Time

Baby Boy Quilt

This quilt started with the Marine print by Dan Stiles for Birch Fabrics, I’d been thinking about using the strips but didn’t really have a plan or purpose. Enter a self-imposed crazy deadline for a baby boy quilt and I had the four solids, backing/binding fabric & matching threads picked out in my lunch break. The piecing and quilting were kept really simple, not just for speed but it’s left the quilt nice and soft.

I wish I had some better photos to share but I was only able to snap a few as I was rushing out the door with this quilt, which I’d put the final stitches in minutes before. I didn’t think to change the camera lens and then the handful of front-on pictures were accidentally deleted by the guy who warned me only minutes before not to do just that… Oh well at least I have a couple photos.

Baby Boy Quilt

My first quilt took a year from start to finish. So how long did the second one take?

Five nights. No really! How’s that for a productivity boost.

I certainly didn’t plan it that way, but that’s how long I had between hearing that a friend’s 12 week old baby had been in hospital, and when we’d be seeing his Dad next, just before Christmas. Thankfully he’s ok and back at home, but I thought a bright and fun quilt might help provide some comfort and cheer for the family.

It turns out I stuffed around a lot making my first quilt, but I learned a lot to. This time, I wish I’d thought to trim the batting and then fold over the excess backing as the binding to machine stitch, but I did the binding the standard (long) way. I’d like to learn to do machine binding for these types of quick, heavy use quilts. I did notice my seams were much straighter and more even this time around so that’s a win.

My First Quilt – Part 6: Finished! Finally.

Well she’s all done.

I had originally picked out a white-on-black spot for my binding, but after choosing the printed backing, rather than the pieced back with solids I was planning, it was all a bit too busy. Instead I went with a solid black binding to frame the quilt. There’s no way I could have settled on a single colour and I think the binding also ties in the bits of black from the backing.

Rainbow- Snapshots Finished

I’m so happy with how the spiral quilting turned out. The free motion part in the middle is a bit wonky, but that just adds character, right?

Rainbow- Snapshots Quilting

The print on the back has worked so well in balancing the front, the circles and squares are a great contrast and while the colours are all brights I found the top seemed to be more cool colours, where as the back is beautiful and warm.

Rainbow- Snapshots FinishedRainbow- Snapshots Backing

I also decided to hand embroider the label for this quilt. I just couldn’t find a great pen/marker/printing solution that looked like it would work and remain legible through a (hopefully) long life. I was reading a lot of blog posts about labeling quilts and checking out different labels on Flickr so decided I wanted to make this a good one and spent that bit of extra time creating my label.

Rainbow- Snapshots Label

So there you have it, my first quilt, finished by the end of the year which was my goal. If you missed in one of the earlier posts, this quilt is based on Snapshots by Elizabeth Hartman from her book The Practical Guide to Patchwork: New Basics for the Modern Quiltmaker.

I’ve made a small baby quilt since, and have also started on my next bigger quilt project.

Rainbow- Snapshots Folded

A Sashiko Sampler

Just a quick finish to share from earlier this month, a sashiko sampler panel. I bought 3 of these panels and the slightly less traditional variegated thread at the Sydney Craft & Sewing Show after taking a workshop with Indigo Niche which resulted in a finished scissor pouch.

Sashiko Sampler from Indigo Niche

These panels are great little travelling projects. Most of this one was completed while out and about at bike races. I had the panel folded, the thread, a needle and a small pair of scissors all inside a little pouch that went out with me all the time.

I haven’t decided exactly what this will become but I’m counting the panel as a finish for now.

Pin Cushions

Green and purple pin cushions

I wanted to make this pin cushion for a friend’s birthday present to go with her new sewing machine. I had just enough fabric of each of the green and purple scraps to make two, so why not! They came together in an hour or so.

Green and purple pin cushions

Each cushion needs two squares of fabric, a bit of stuffing, some ribbon and a couple of buttons (these ones were from my stash of spares that come with new clothes – Ben Sherman & Esprit).

For anyone who’s interested, I loosely followed these instructions for a Bric-a-brac Pincushion. Next time I’m going to try this Classic Pincushion – love the fussy cutting of the green pattern.

Green and purple pin cushions