Category Archives: craftsy

Riley Blake MQG Challenge – Quilt-As-You-Go Bag

It was a perfect match, a Modern Quilt Guild Basics Challenge sponsored by Riley Blake Designs to make anything quilted, with six fat-eighths to start us off, and a fabulous Craftsy class to make Quilt-As-You-Go Patchwork Bags that I could not wait to try. I’m so excited to share this bag so look out, lots of pretty pictures coming up!

Riley Blake Challenge - Quilt As You Go Bag

I’d been hoping for a chance to take the Quilt-As-You-Go Patchwork Bags Craftsy class with with Tara Rebman when it was announced that Riley Blake Designs would be sponsoring the 3rd annual MQG members fabric challenge, we heard about it at a Wollongong MQG sew day and I knew exactly what I was going to make. Light bulb moment!

Riley Blake Challenge - Quilt As You Go Bag

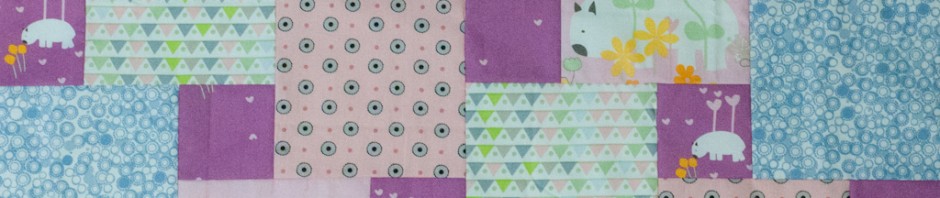
We received our fabrics towards the end of last year as 5.5″ x WOF strips from the range of Riley Blake basics. The fabrics I received were:

  • solid dark grey
  • light grey and white 1″ stripes
  • navy and white medium gingham
  • aqua tone on tone medium chevron
  • white on yellow small dots
  • orange pop

Riley Blake Challenge - Quilt As You Go Bag

I’ve supplemented these with some other Riley Blake fabrics from my stash and a few solids including:

  • yellow tone on tone small dot
  • orange tone on tone small dot
  • white on aqua dot
  • orange solid
  • yellow solid
  • sea green solid
  • navy solid for the bias binding
  • navy blue solid cotton duck cloth for the bag base

Riley Blake Challenge - Quilt As You Go Bag

I started off by cutting a few small and medium strips and squares of varying sizes from each fabric and began the quilt as you go process which uses a log cabin approach. Each round adds a new piece of fabric to cover the join of the previous two pieces and gets quilted down (as you go), towards the edges using pre-patched slabs rather than single fabric pieces. Stay tuned for an upcoming post reviewing the class and sharing some more details of the bag making.

Riley Blake Challenge - Quilt As You Go Bag

I used Aurifil 50wt threads for this project, a light grey/silver (2600) for piecing & quilting the main panels and navy (2745) for quilting on the base panel and attaching the bias binding. My quilting is roughly 1/4″ apart, though I did vary on purpose to give some subtle difference in textures and in some cases to suit the fabric.  My favourite part of the quilting is this navy gingham piece below.

Riley Blake Challenge - Quilt As You Go Bag

The bag is a pretty good size as you can see above with it on my shoulder. In opens up wide and has a handy flap with magnetic snap to keep it closed. I included both pocket options, a hidden zipper pocket on one side and a divided pocket on the other.

Riley Blake Challenge - Quilt As You Go Bag

I really love these challenges, this one in particular took me out of my comfort zone with colour but seeing all the fabrics combined I quite like the overall effect of the outside of the bag.  I wish I didn’t choose an orange solid for the lining, next to the navy binding all I see is football team colours. This is a perfect case where a subtle tone on tone chevron or dots would have been a better choice for such a large area. I already have some fat quarter packs of the Riley Blake small dots and tone on tone dots and I’m sure more of their basics will make their way into my stash, I just haven’t been able to source it locally yet so couldn’t get it in time to finish my bag.

Riley Blake Challenge - Quilt As You Go Bag

A huge thanks to Riley Blake Designs for sponsoring this challenge and providing the fabric for us to play with. Thank you also to the Modern Quilt Guild for organising these challenges for us and to our awesome leader Rachael of the Wollongong Modern Quilt Guild who does all the organising so we can participate.

Ada’s Quilt: Step Down Piecing with Wombat Wonderland

This sweet little quilt combines a whole lot of Aussie inspiration. The fabulous fabrics are from Saffron Craig’s Wombat Wonderland collection which are 100% organic GOTS approved cotton. The pattern is a technique from Sarah Fielke’s Craftsy class, Big Techniques from Small Scraps. How adorable are those wombats?!

Ada's Quilt - Step Down Piecing using Wombat Wonderland by Saffron Craig

The larger squares were fussy cut from Wombats in my Garden and complemented by Sunrays, Flower Spot and (my favourite) Triangles. The smaller dark squares are from Wombat Lovehearts, there was the occasional bit of wombat surgery, creating some of my favourite details with wombats wandering in and out of their little windows.

Wombat Wonderland

I used strips of the same range for the back, including Sunflower Garden which was too pretty to cut up for the front.

Ada's Quilt Back

I finished up the top a couple of weeks ago, you can read more about the technique and the rest of Sarah’s class in my previous post. The top came with me on a long weekend away where it was basted and I began the hand quilting, approximately 1/4″ inside each of the squares.

Hand Quilting & Embroidery

The quilting was done in bursts over a few weeks, once I started each session I didn’t want to put it down. I really enjoyed this process and found Sarah’s technique easy to pickup and really enjoyable, when you get into a groove it is quite meditative. The result of using organic cottons and hand quilting is a beautifully soft baby quilt.

I love the striped binding, reminds me of liquorice all sorts (yum!)

Stripey Binding

This quilt was gifted to a work friend whose baby girl arrived in January. In place of a label I hand embroidered her name and the year. I hope it’s used and loved for some time to come.

Ada's Quilt

Quilting From Little Things

Continuing on with the Craftsy love from before (I sense a theme developing here), I signed up for Big Techniques from Small Scraps, or Small Stash as is my case so far, with Sarah Fielke and am really loving it!

I had the class in my Craftsy wishlist for a few weeks, thinking I’d have another look when I had watched and worked on a bit more of the Machine Quilting Negative Space class with Angela Walters. I was tempted by a couple of the sales, and then got an email from Craftsy offering a really good deal on the class to treat myself because it was in my wishlist, and that I did. That was pretty awesome of them, so thanks Craftsy!

Honestly there were maybe two techniques I was initially interested in and thought I wouldn’t be as keen about the rest, boy… was I wrong. I watched the first few classes and wanted to try them all. I think that seeing the techniques demonstrated for you is a huge advantage. I’m sure I could figure it out from a book or magazine with good written instructions but then I find the photos of the finished item have to really pull me in to want to try it. If the colours or prints aren’t really my style sometimes it’s hard to look past that. In this case, seeing the individual techniques is what convinced me to want to try them and make something, it wasn’t all about the finished item but learning how to do something new.

I settled on the Step Down Piecing technique first as I was planning to make a baby quilt anyway, and had the perfect 50cm pack for it. The fabric is the 100% organic cotton, GOTS certified range Wombat Wonderland by Saffron Craig. It’s beautiful fabric to work with, I was lucky that the smaller wombats on the dark purple background were the perfect fit for the small squares, both in size and contrast.

Step Down Piecing Top

I decided I wanted the top ready to take away with me to hand quilt a few days later so I got stuck right in, I probably spent more time fussy cutting the wombats than sewing. I only got it finished late the night before I had to leave, hence the bad night lighting in the shot above.

The Step Down Piecing technique is really interesting and not all that hard in terms of sewing. Laying out the pieces first is a huge help, putting the first few pieces together was a bit tricky but once you get going it comes together easily. I found that it was a bit like free motion quilting, 80% of the technique is just knowing where to go next (something I’ve picked up from Angela Walters’ class).

I’m currently hand quilting the quilt after seeing another little promo video by Sarah which you can watch below. Seeing someone demonstrate what are quite simple steps makes something seem so much more achievable. If you’re a visual learner, Craftsy classes are perfect for you.

Next on the list is needle turn applique, I’ve got my little kit of Sarah’s recommended supplies and her book, Quilting from Little Things, for eye candy. This book has most of the same techniques in small and large project pairs. Can’t wait to start my next little project.

Sarah Fielke Applique Kit

Craftsy Class Sketches

I’ve recently discovered Craftsy, an online community for people who like to make things. It’s main concept is to provide online video classes that cover quilting, knitting, crochet, cake decorating, jewellery, paper crafts and more.

After taking a look at a couple of the free class videos, and being really impressed with the concept and format, I took the plunge and opted to try a paid class – Machine Quilting Negative Space with Angela Walters. Below are some of my quilty sketches from Lesson 2 of the class.

Craftsy Quilting Class - Lesson 2 Sketches

While you can learn a lot from YouTube, these videos are professionally filmed, follow structured class formats and provide supporting class materials. You need an Internet connection to watch the videos through your browser, or the iPhone or iPad apps, but you can watch the videos as often as you like, pause, rewind, watch something over and over until you’re ready to move on, and even save notes any any point along in the video.

The community site lets you create a profile, post progress updates, and best of all, ask question and interact with your other ‘classmates’ and your expert teacher! In addition to classes you can participate in workshops (craft-alongs) and upload projects (which may or may not be related to the classes). If that wasn’t enough, there’s an online store for fabric, yarn and other class-related supplies, and you can also purchase patterns by other Craftsy users.

There are free classes to try on basic sewing, bag making, a patchwork block-of-the-month and other starter techniques & small projects. I’d definitely recommend giving one a go just to see what it’s all about. It doesn’t matter if you don’t complete the whole class, they’re a good taster for the format and flow of classes if something else interests you.

There are a variety of paid classes that range between approximately $15 – $50. I have worked out that by purchasing classes via the iPhone or iPad app they’re processed as in-app purchases which means you can use iTunes credit (from vouchers or linked up to a card).

So what are you waiting for, go try a Craftsy class to learn & make something new!