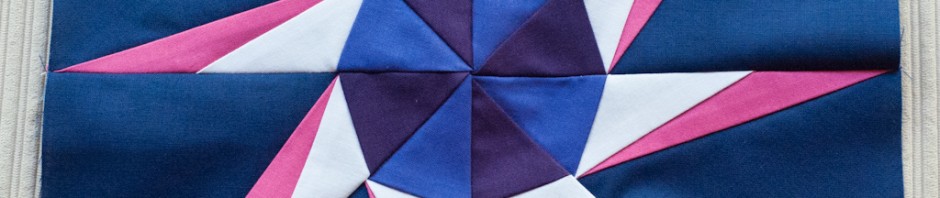
There’s nothing like getting the next month’s block pattern in your email to spur you on to finish the previous month’s block! I had played with colour options for the February block in Illustrator and had all my pieces cut out for a couple weeks but only got to put this together one afternoon on the first weekend of March.
I wasn’t in love with this block before I started, I liked the shapes but just couldn’t get the right parts to shine. Once I started sewing the pieces, the colours just popped and now I love it. This block is definitely better in fabric than it is on paper (or screen) for me. And check out those points! I’m so proud of this block, and happy that I’m seeing improvements in my paper piecing.
I’m really looking forward to the March Ninja Star. I have my colours picked out already. I’ll be sure to have that one done by the end of the month with the Easter long weekend as a last resort.
Thanks again to Elizabeth of Don’t Call Me Betsy for organising this Block of the Month program and for sharing these beautiful stars with us all. The instructions are great and the pieces are easy enough for someone completely new to foundation paper piecing to follow, yet the finished blocks are so effective.
Continuing on with the Craftsy love from before (I sense a theme developing here), I signed up for Big Techniques from Small Scraps, or Small Stash as is my case so far, with Sarah Fielke and am really loving it!
I had the class in my Craftsy wishlist for a few weeks, thinking I’d have another look when I had watched and worked on a bit more of the Machine Quilting Negative Space class with Angela Walters. I was tempted by a couple of the sales, and then got an email from Craftsy offering a really good deal on the class to treat myself because it was in my wishlist, and that I did. That was pretty awesome of them, so thanks Craftsy!
Honestly there were maybe two techniques I was initially interested in and thought I wouldn’t be as keen about the rest, boy… was I wrong. I watched the first few classes and wanted to try them all. I think that seeing the techniques demonstrated for you is a huge advantage. I’m sure I could figure it out from a book or magazine with good written instructions but then I find the photos of the finished item have to really pull me in to want to try it. If the colours or prints aren’t really my style sometimes it’s hard to look past that. In this case, seeing the individual techniques is what convinced me to want to try them and make something, it wasn’t all about the finished item but learning how to do something new.
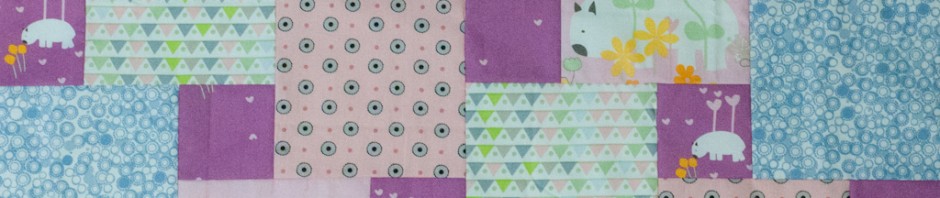
I settled on the Step Down Piecing technique first as I was planning to make a baby quilt anyway, and had the perfect 50cm pack for it. The fabric is the 100% organic cotton, GOTS certified range Wombat Wonderland by Saffron Craig. It’s beautiful fabric to work with, I was lucky that the smaller wombats on the dark purple background were the perfect fit for the small squares, both in size and contrast.
I decided I wanted the top ready to take away with me to hand quilt a few days later so I got stuck right in, I probably spent more time fussy cutting the wombats than sewing. I only got it finished late the night before I had to leave, hence the bad night lighting in the shot above.
The Step Down Piecing technique is really interesting and not all that hard in terms of sewing. Laying out the pieces first is a huge help, putting the first few pieces together was a bit tricky but once you get going it comes together easily. I found that it was a bit like free motion quilting, 80% of the technique is just knowing where to go next (something I’ve picked up from Angela Walters’ class).
I’m currently hand quilting the quilt after seeing another little promo video by Sarah which you can watch below. Seeing someone demonstrate what are quite simple steps makes something seem so much more achievable. If you’re a visual learner, Craftsy classes are perfect for you.
Next on the list is needle turn applique, I’ve got my little kit of Sarah’s recommended supplies and her book, Quilting from Little Things, for eye candy. This book has most of the same techniques in small and large project pairs. Can’t wait to start my next little project.
January block is done! I found this block made from 4 squares instead of the 8 triangles in the practice block seemed to be more straight forward. The blocks probably took a little longer but only having 3 seams to sew to turn it into a complete block made it super quick.
I’m attempting to get a bit designery (that’s a technical term) with these blocks by mocking them up in Adobe Illustrator and trying out my colour combos first. It seems to be working in that my original plans for the colour placement within the blocks look ok, but with a bit of swapping and changing around I’ve found a variation that I think achieves what I’m going for just that little bit more. Sometimes along the way I discover a way to emphasise different patterns in the block than I orginally saw.
You’ve probably heard of Photoshop, I use that quite a bit for my work. Illustrator is a kind of sister program to Photoshop that allows you to draw, manipulate and resize lines and shapes where as Photoshop is more like painting (and photo editing). I’ve been wanting to expand my skills in Illustrator, so far my experience is limited to making small edits to other peoples work. My idea of tracing, drawing or designing quilt blocks seemed like a good fit for Illustrator so with that in mind I’ve been trying a few tutorials. Kmac Quilts has a small series including some good tips on setting up grids based on your common quilt sizes. I also found a handy tutorial from Vector Diary on how to outline and colour in your quilt.
The below images show how I originally thought I would place the colours (left) and another variation that I really liked which I think gave emphasis to different parts of the block (right). What I ultimately wanted was a kind of exploding starburst effect so what you see in the block above was what I ultimately went for.
I’ve been a bit slow to start but here’s my first block for the Lucky Stars Block of the Month with Elizabeth Dackson of Don’t Call Me Betsy. This is just the practice block released back at the end of December and was my first attempt at foundation paper piecing.
So far I’m really loving this technique! I had a vague understanding of how it worked but had never seen it done. Someone posted a link to the video below in our Flickr discussion groups for the Lucky Stars BOM Club. Even though Elixabeth has supplied us with great instructions and templates, watching this video and just seeing it done once was huge help and the steps have been easy to follow.
I’ve decided to go with all solids for my blocks, brights on a navy blue background and in each block I’ll make a feature of one of the elements in white. Time to get cracking on the January and then February blocks.
I’ve recently discovered Craftsy, an online community for people who like to make things. It’s main concept is to provide online video classes that cover quilting, knitting, crochet, cake decorating, jewellery, paper crafts and more.
After taking a look at a couple of the free class videos, and being really impressed with the concept and format, I took the plunge and opted to try a paid class – Machine Quilting Negative Space with Angela Walters. Below are some of my quilty sketches from Lesson 2 of the class.
While you can learn a lot from YouTube, these videos are professionally filmed, follow structured class formats and provide supporting class materials. You need an Internet connection to watch the videos through your browser, or the iPhone or iPad apps, but you can watch the videos as often as you like, pause, rewind, watch something over and over until you’re ready to move on, and even save notes any any point along in the video.
The community site lets you create a profile, post progress updates, and best of all, ask question and interact with your other ‘classmates’ and your expert teacher! In addition to classes you can participate in workshops (craft-alongs) and upload projects (which may or may not be related to the classes). If that wasn’t enough, there’s an online store for fabric, yarn and other class-related supplies, and you can also purchase patterns by other Craftsy users.
There are free classes to try on basic sewing, bag making, a patchwork block-of-the-month and other starter techniques & small projects. I’d definitely recommend giving one a go just to see what it’s all about. It doesn’t matter if you don’t complete the whole class, they’re a good taster for the format and flow of classes if something else interests you.
There are a variety of paid classes that range between approximately $15 – $50. I have worked out that by purchasing classes via the iPhone or iPad app they’re processed as in-app purchases which means you can use iTunes credit (from vouchers or linked up to a card).
So what are you waiting for, go try a Craftsy class to learn & make something new!